
Dana can be used without any installation steps, simply by extracting the zip file and running the executable files directly. Following a couple of configuration steps makes using it easier, however; configuration steps for each platform are detailed below.
Windows
Create a folder called "dana" somewhere on your computer (maybe on C:\). Download the latest version of Dana and extract the contents of the zip file into this directory. We refer to the directory containing the files dana.exe and dnc.exe as Dana's home directory.
Next we need to set an environment variable for Dana's home directory and tell Windows where the executable files are so that we can run them from anywhere. These steps are optional, but make using Dana easier.
Go to Control Panel, System, Advanced System Settings. Click on Environment Variables. Note these steps may be different on different versions of Windows (if you're not sure, search online for how to add environment variables for your version of Windows).
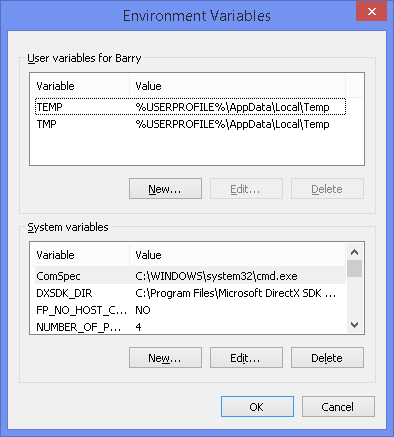
In the lower list of environment variables (system-wide),click on New
In the variable name field, enter DANA_HOME
In the variable value field, enter the path to Dana's home directory as defined above.
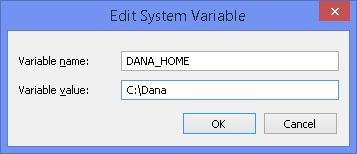
Click on OK.
Now find the existing environment variable in the same list called "path" or "PATH". Click on it and click Edit. In the variable value field, go to the very end of the text, and add a semi-colon, then type the path to Dana's home directory as defined above. This tells Windows where to locate Dana's executable files.
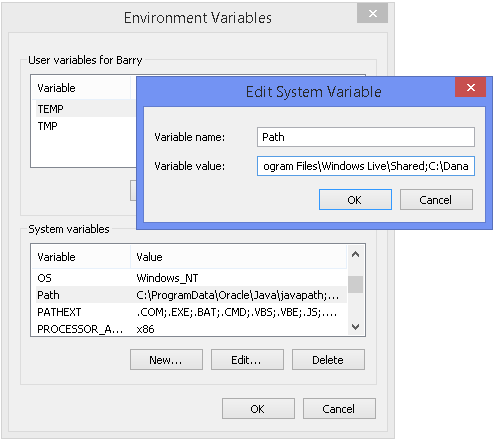
Click on OK.
To test your install, open a command prompt window anywhere and issue the command:
dana app.SysTest
You should see a collection of information about your system printed out; if this didn't work, re-check the above steps and try again.
If for any reason you are unable to set environment variables on your system, you can provide DANA_HOME directly to the Dana runtime and/or compiler by using the -dh command-line parameter, for example:
dana -dh "C:/path/to/dana/" app.SysTest
Linux
Create a folder called "dana" somewhere on your computer (maybe in your home folder). Download the latest version of Dana and extract the contents of the zip file into this directory. We refer to the directory containing the files dana and dnc as Dana's home directory.
Now we need to make these files executable. Open a terminal in Dana's home directory and type chmod +x dana dnc and press enter. Close the terminal window.
Next we need to set an environment variable for Dana's home directory, and tell Linux where the executable files are so that we can run them from anywhere. These steps are optional, but make using Dana easier.
You can set environment variables on most Linux distributions by opening the file ~/.bashrc (this is a file called ".bashrc" in your Linux user home directory) and adding to the end:
export DANA_HOME=/home/where/you/put/dana/
PATH=$PATH:$DANA_HOME
Then save the file, log out and log in again.
To test your install, open a terminal window anywhere and issue the command:
dana app.SysTest
You should see a collection of information about your system printed out; if this didn't work, re-check the above steps and try again.
If for any reason you are unable to set environment variables on your system, you can provide DANA_HOME directly to the Dana runtime and/or compiler by using the -dh command-line parameter, for example:
dana -dh "/home/path/to/dana/" app.SysTest
Mac OS X
Create a folder called "dana" somewhere on your computer (maybe in your home folder). Download the latest version of Dana and extract the contents of the zip file into this directory. We refer to the directory containing the files dana and dnc as Dana's home directory.
Now we need to make these files executable. Open a terminal in Dana's home directory and type chmod +x dana dnc and press enter. Close the terminal window.
Next we need to set an environment variable for Dana's home directory, and tell OS X where the executable files are so that we can run them from anywhere. These steps are optional, but make using Dana easier.
You can set environment variables on most OS X versions by opening the file ~/.bash_profile. This is a file called .bash_profile in your user home directory, usually /Users/your_name/. Some Mac OS distributions use a different default shell version called zsh which has a corresponding config file ~/.zshrc instead. If the file does not exist you'll need to create it. Now add these two lines to the end of the file:
export DANA_HOME=/home/where/you/put/dana/
PATH=$PATH:$DANA_HOME
Then save the file and close any open terminal windows.
To test your install, open a terminal window anywhere and issue the command:
dana app.SysTest
You should see a collection of information about your system printed out; if this didn't work, re-check the above steps and try again.
If for any reason you are unable to set environment variables on your system, you can provide DANA_HOME directly to the Dana runtime and/or compiler by using the -dh command-line parameter, for example:
dana -dh "/home/path/to/dana/" app.SysTest
Upgrading your installation
You can update your Dana installation from your DANA_HOME/components directory using the command:
dana source update
If you want to completely replace your installation, you can simply copy a new version of Dana into your existing Dana home directory, overwriting all files with the same name. The only case in which this may not be safe is if you have added or modified any components in Dana's standard library directory, which may get overwritten when you do this.
Some Dana updates may change the compiled object format, so that existing compiled projects outside of the standard library may not work, giving an error message like:
Component compiled for a different VPU version
In this case you simply need to re-compile the project with the new Dana compiler.
Removing your installation
Dana does not touch any files or system settings outside of its install directory. To completely remove your installation, you can simply delete your install directory, then remove the modifications to your system environment variables that were described above. That's it!